
There has not been anytime so far to upload the panoramas of Japan or to bring news of the developments in 3D modelling. Suffice to say its been hectic but we will post up news and images as soon as we can.
A big thank you to the blog readers who have come to the talks so far, we will be posting more details asap.
2007-01-28
2007-01-22
Japan Lecture Dates
 We are about to leave to give three lectures on Digital Cities and Virtual London in Japan and one in Monaco. Details for the Japan lectures, for those wishing to attend are as follows:
Thursday 25th January, Hokkaido University, Sapporo, 10.00 - 12.00 pm, Hitachi Software Engineering Co. Ltd. I don't have room details currently but if you are interested contact Professor Homma Toshihisa for more information;
Saturday 27th January, Tokyo University, Tokyo, 10.00 - 12.00 pm, Centre for Spatial Information Science. Full details can be found the on the seminar page (in Japanese);
Monday 29th January, Ritsumekan Univeristy, Kyoko, 13.30-17.15pm. View the pdf flyer for full details.
If your coming along please feel free to come and say hello after the lecture...
2007-01-20
Japan, Monaco and Postings
 Next week sees us flying off for a series of conferences in Japan and Europe. If your a reader in Japan we will post up the dates and locations on Monday as each of the lectures - on Digital Cities - is free to attend.
During the week we will be bringing the latest news from the best Japanese Research Labs regarding city modelling and digital representations of the city.
After Japan we are off to Monaco for the VizMasters Design Modelling and Visualisation Conference on Feb 2nd to talk on when architecture and games collide. While preparing the presentation this weekend we will be loading up the XBox 360 and capturing some city movies, so expect a post on XBox 360 modelling and a YouTube walk through early next week.
In the meantime we are about to take the word verification systems off the comments systems after a couple of emails saying its tricky to use. Its in place to stop spam, but if its also stopping commenting then it has to go.. So feel free to comment on any posts without having to try and work out what letters are in the word verification box.
2007-01-18
Second Life 'Cut out and Keep' Octahedron Panorama

Second Life is a multi user virtual environment and we thought it would be neat to have an analog version on our desk - thus we present the 'Cut out and Keep' Second Life panorama of Nexus Prime. Of note in the panorama is the inclusion of the 'Snow Crash sign - Snow Crash by Neal Stepehnson is of course the cyberpunk novel that led the way in predicting 'jacking in' to virtual worlds and the embodiment of avatars.
You can download the high res PDF to cut out and keep, full instructions are included. (7.9Mb).
The Second Life panorama can be viewed in Quicktime VR from here (1Mb).
If there is a location in Second Life you would like to feature in 'Cut out and Keep' then drop us a email via the link in the side bar.
Kite Aerial Photography Immersive Panoramas in Google Earth

Kite Aerial Photography (KAP) has always intrigued us, we own a large power kite and of course the panoramic gear, we just haven't had the faith in our kite flying skills to combine the two. Scott Haefner runs one of our favorite sites and has just sent us a email to let us know that he has put a number of his KAP panoramas into Google Earth using our 'Step inside Spheres'.
The Spheres, Google Earth and KAP go hand in hand and are well worth a look, in fact its stunning to see the use of these three technologies together. Take a look at Scotts site for the Google Earth files.
If you want to create your own Google Earth 'Step Inside Sphere' or 'Google Earth Bubble' (we are still thinking of a good name for them) then follow our Tutorial.
2007-01-16
Google Map Image Creator - Preview
Modelling buildings often demands resolutions higher than medium priced digital cameras can capture. To this end we often use a zoom lens and stitch together a batch of images to create a high resolution facade.
To date there has been no easy way to place these images online for viewing, as such we are pleased to announce the forthcoming GMap Image Cutter by Richard Milton at CASA (home of digital urban). GMap Image Cutter slices up high resolution images and creates a Google Map template in which to view them, a quick and easy solution to sharing or proofing large image files.
Pictured above is the Old Dispensary in Newham, London - use the controls to zoom in and out. Created from over 20 6Mb photographs it captures enough detail to assist the modelling process, GMap Image Cutter has processed the image into 1365 separate files.
Andy Warhol Elvis Google Earth Panorama
 In another in a series of posts detailing how to create 'step inside panoramas' viewable in Google Earth we combine 3D models with panoramas to go inside the Tate Modern, London.
By embedding a panorama inside the building and combining a series of viewpoints you can fly around the outside of the Tate and then go inside to view the Andy Warhol exhibition.
 To view Elvis and Marylin Monroe by Andy Warhol in Google Earth, download our kmz file and click on the viewpoints to 'step inside' the Tate Modern.
Google Earth Panorama of Snowdon

Barry Hunter from the nearby.org.uk blog has been quick off the mark using our tutorial to create an impressive use of panoramic imagery in Snowdon, Wales. The movie below gives a preview of the 'step inside' panorama:
You can download Barrys kmz file of Snowdon and fly around the scene in Google Earth.
Google Earth Trafalgar Square, London, Panorama

Using our Tutorial on How to Create Immersive Panoramas in Google Earth we have placed online a panoramic view of Trafalgar Square, London. Within the file are two viewpoints - Nelsons Column and the National Gallery, click each viewpoint to fly around the panorama and view the scenes full screen.
We have over 100 panoramic scenes on the blog and over time we will be converting them to Google Earth, complete with viewpoints and text based information. Since we put the tutorial online we have noticed a number of examples being created, later today we will start a post listing all of the panoramic globes in Google Earth
Download the Google Earth Trafalgar Square Panorama (kmz).
2007-01-15
Google Earth Panorama Viewer Tutorial and Files

DigitalUrban is pleased to release its Panorama Viewer for Google Earth. The viewer has been created to be as easy to use as possible, all that is needed is a panorama - either from your local drive or via the web at sites such as Flickr - and a single change to the file name in Notepad.
We provide a step-by-step tutorial to create your first Google Earth panorama after the concept movie below which illustrates a series of London panoramas viewable in Google Earth.
To create your own panorama in Google Earth take the following steps:
Step 1
Download the Collada file from our server and save it to your hard drive (320k) - note due to issues with our server mime types it will download as PanoViewer.txt, rename the file to PanoViewer.dae. We will have this fixed asap..
Step 2
Locate your panorama and note down its name or web location, it should be a .jpg file.

For this example we are using a High Dynamic Range panorama of the Swiss Re building in London. Our panorama is saved at 3000x1500 pixels, higher resolutions are possible its simply a trade off between file size and resolution.
You can download our panorama from here (675k)
Step 3
Open the Collada file 'PanoViewer.dae' in a a text editor, we use WordPad, and locate the following line:
init_from>
Change this to reflect your file name of http address, in our case we change it to:
init_from>
if the file was on the web we would use:
init_from>
Now save this file and open Google Earth.
Step 4
Flyinto the location of your panorama in Google Earth, in our case just above the Swiss Re building.

Now we simply need to open the file in Google Earth, you can do this in one of two ways, the simplest is to drag 'PanoViewer.dae' into Google Earth where it will automatically load. The second way is to go to 'File Open' and make sure you have 'Files of Type - All files' selected, now locate the .dae and select it to open.
 The panorama will open in Google Earth, as pictured above. We now need to move the panorama to the correct location, starting with changing its altitude.
Select the Altitude tab and move the viewer up to your desired amount, we use 28m by default. Now simply drag the panorama to the correct location by clicking and dragging on the centre cross and rotate by clicking on the small green square.
The panorama is now in place and ready to view or save as a .kmz and share. Navigation is best with the SpaceNavigator at the moment as the default mouse view in Google Earth does not allow the user to view around a fixed location, hopefully this will be changed in a later update.
Since posting the tutorial a few hours ago Frank Taylor from the Google Earth Blog has found a great work around for users of Google Earth that don't have a SpaceNavigator. Once you have created the panorama you can add in multiple placemarks which are essentially viewpoints in the scene. To look around the sphere all you need do is click between the placemarks.
You can view the end result of Franks additional viewpoints here (.kmz file).
Let us know if you use the file and if you do a link back to the blog would be appreciated as it all helps spread the ideas...
2007-01-13
Clay Rendering in 3DMax
Rendering 3D models can be over complicated, our favorite technique is the quick and easy 'Clay' render using 3DMax.The image above was created in SketchUp and then simply imported into Max using the .3ds export.
Once in Max take these simple steps to produce a image similar to the one above:
1) Add a 'Skylight' to the scene (click lighting, select a Skylight and click in your scene).The Skylight can be placed anywhere as is not a direct lighting component.
2) Hit F10 to bring up the Render Dialog and select the 'Advanced Lighting' tab, now click 'LightTracer'
3) Render your scene.
That's it, a quick and simple render that we often use for our images.
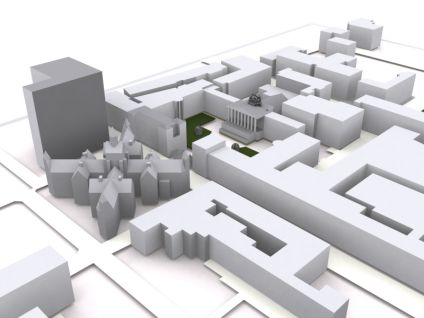
Google Earth 'Step inside a Panorama'
We have run through the process and it will take no more than 5 minutes to place a immersive panoramic sphere into Google Earth. The tutorial should take in no more than 3 simple steps and will (fingers crossed) be available on Monday. If your new to this, and many people will be as it doesn't seem to of been picked up by the Google Earth community at the moment (i think its kind of neat personally (?)) then the two preview movies are below..
Panoramas Embeded within a Building
General Concept
It will also of course be free as its just a concept and that what this blogs all about.. sharing concepts and ideas.
Panoramas Embeded within a Building
General Concept
It will also of course be free as its just a concept and that what this blogs all about.. sharing concepts and ideas.
2007-01-12
Morphing the City - London 'Unfixed'
Our phase one model of London used to cover 20km, it now extends to the M25 which is over 2000km. However, one of the demonstrators for phase one was the ability to morph the skyline and rise/lower buildings according to application.
The movie above demonstrates this with 30 St Mary Axe (The Gherkin) rising and sinking out of the ground to be replaced by various fictitious options. A simple movie, but one that hopefully demonstrates the value of a digital model (?)..
The movie above demonstrates this with 30 St Mary Axe (The Gherkin) rising and sinking out of the ground to be replaced by various fictitious options. A simple movie, but one that hopefully demonstrates the value of a digital model (?)..
Painting the Urban Environment Digitally
 Modelling the urban environment holds its difficulties but at least you often have a series of images/shapes to base your model on. Picked up from CGarchitect is a fascinating tutorial by Daarken on painting urban images in Photoshop.
Daarken's tutorial provides a step-by-step walkthrough of creating the scene from starting with a blank canvas to ending up with the finished image.
Of note is the starting point of empty document, no starting image or reference point, just a series of brush strokes and techniques to produce a image which approaches photorealisim.
2007-01-11
SketchUp Photo Match

Photomodelling has long been a specialised subject in the 3D world. Dominated by the likes of ImageModeller by Realviz and Photomodeler by Eos Systems the emphasis has always been on camera lens calibration and point matching, making it a time consuming process.
Google in their release of SketchUp Pro 6 have now made photomodelling available to the general user in the form of their new 'Photo Match' feature. We have had chance to try it out and it significantly speeds up the modelling process for urban visualisation.
The ability to quickly and easily set up the modelling viewpoints perspective to match a photograph allows one to simply trace a buildings outline and thus create its geometry. Once the outline is created you can then apply the image to the mesh providing instant phototexturing.
While its obviously not as accurate as the photogrammetric solutions it is significantly faster and easier to work with.
2007-01-10
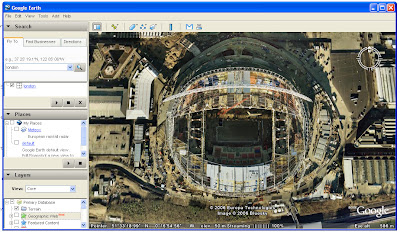
Panoramas inside Buildings in Google Earth - Panorama Viewer Preview 2
Using the forthcoming panorama viewer for Google Earth it is possible to embed 360x180 degree panoramas inside of buildings and thus fly inside to look around. The movie illustrates this concept with the Tate Modern, London
The viewer is almost ready to roll, we just need to find some time to write the tutorial and then upload the file to edit on our server...
2007-01-09
SketchUp Pro 6 Released
 Google has just released SketchUp Pro version 6. Sketchup is by far our favaourite peice of software to date and is the only design tool which we can clearly say is a joy to use. Version 6 has a numbe rof new features, including:
- Photo Match - Use photos to build accurate 3D models much more easily than starting from scratch.
- Styles - Personalize your model by creating your own Style with the new display settings, Sketchy Effects and Watermarks.
- Sketchy Effects - Renders edges to look as if they were drawn by hand. Choose from a variety of line strokes such as Graphite on Bond, Loose Marker and Shakey Pen.
- Watermarks - Place 2D images behind or in front of models.
- Fog - Adds atmospheric haze and a sense of depth to your model.
- 3D Text - Create signs and letters and choose from simple outlines, filled surfaces, and fully extruded 3D text.
You can learn more about the new features in SketchUp Pro 6 as well as taking a look at the new video tutorials. At the moment the SketchUp site seems to be offline but as soon its back we look forward to giving the new features a spin.
2007-01-08
Terragen 2 Preview Released
 Going hand in hand with our love of city visualisation is visualisation of landscapes. The original Terragen package was one of the best and certainly cheapest (its free) landscape visualisation suites available, and they have now released a tech preview of version 2.
We are just about to download the new version and we will post some thoughts soon as we can, in the mean time its worth taking a look at the stunning images in the gallery and wondering how long those movie render times are go to be this time around.
2007-01-06
How to Create a Professional Zoom Movie in Google Earth (Free Version)
*Update - see our latest post, creating a zoom movie in Google Earth is now much easier... *
The best movies of earth involve a zoom from space to a ground based location. Obviously with Google Earth we can navigate around the globe but its not so easy to create a movie zooming down to a specific location.
You can always use placemarks but the path is not always the one desired and the framerate can be too fast to capture a movie. It would also be good to be able to use the free version of Google Earth rather than the 'Pro' which has the ability to export movies.
To this aim we found that the best way to control the movie capture is to start from the ground and zoom out - to then gain the impact of zooming from space all you have to do is reverse the movie. In this tutorial we show a step by step method to achieve results similar to the movie below, it should take 15 minutes from starting your capture to the finished result.
To create the movie you will need a few pieces of software, firstly Google Earth, secondly FRAPS (to capture the movie) and finally VirtualDub and Avisynth to reverse it.
Step 1: Local Cache
First of all we are going to do a test run to ensure all the images from Google Earth are in our local cache before we record the movie, this will ensure we don't have to wait for images to download while we are capturing.
 To zoom out smoothly from the earth a good technique is to use the 'double right click' method, this provides a regular zoom level and a smooth method to capture the movie, once we have loaded all the images into cache we are ready to record the movie.
Step 2: Record the Movie
FRAPS is excellent software which allows you to capture at high resolution and high frame rates from any package that uses OpenGL or Direct X. As such FRAPS can be used to capture any movie you wish in Google Earth in real-time, this is not only a considerable time saver compared to the 'Pro' version of Google Earth, it also means you can make movies in the free version.
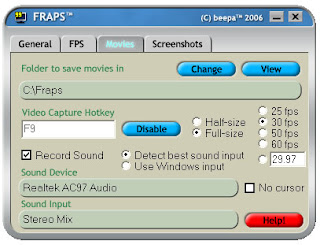
To record the movie we simply load up FRAPS, note which hotkey to use to capture movies (we use F9) and then maximise Google Earth. Hit the FRAPS hotkey and then start zooming out from your chosen location to space, we recommend a slow smooth zoom using the right double click method which we outlined above.
When you have reached a view of the earth to end the movie simply re-hit the FRAPS hotkey and your movie will be saved. It will of course be a movie zooming out of the earth which is not what we want but it has enabled us to capture smoothly, while controlling the location, something which is difficult when zooming into a view.
Step 3: Reversing the Movie
We can reverse the movie quickly and easily using VirtualDub and Avisynth, firstly install the applications and then launch VirtualDub. To enable the movie to reverse we need to take two simple steps, firstly to open the video and save as a uncompressed avi.
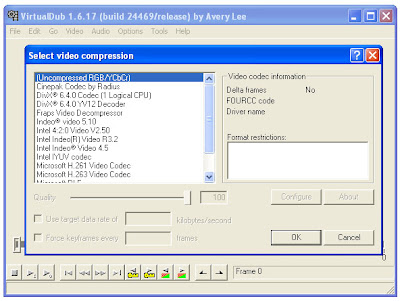 To do this, firstly open the movie and then select 'Video/Compression/Uncompressed' from the tool bar and click 'ok'. Now save your movie by selecting 'File/Save as avi'.
Your movie is now uncompressed and ready to be reversed. This is the final step and requires a small script to be saved and opened in VirtualDub. This again is easy, open up Notepad and cut and paste the following:
AviSource("yourmoviename.avi").Reverse()
Now save this notepad file as 'Reverse.avs' and open it in VirtualDub by going to 'File/Open Video File' and selecting Reverse.avs. Our movie is now shown zooming in from space to our location, click 'File/Save as avi' again and your movie is saved and ready to edit in a movie package such as Windows Movie Maker or to upload direct to YouTube.
If you use this tutorial we would love to know so leave a comment or get in touch via the sidebar.
Others in the 'How to' series include: How to Create an Aerial Panorama from Google Earth and Isometric Pixel Art - Simulating in SketchUp Tutorial.
Model Blog Web 2.0 (?) and Up and Coming Posts
In the meantime its a dull rainy day in London so we are about to sit down with a coffee and write a tutorial on how to create free reverse movies from Google Earth. Why would you want to reverse a movie (?) - to create a smooth perfect zoom in to your favourite location from earth, just like the movies on Discovery or the BBC, the post will be online later today.
As a update to the Google Earth Panorama Viewer.. it should be released, again with a tutorial, later this week.
*Edit 18.43/6th Jan 2007*
Well the coffee was good and the tutorial on creating movies in Google Earth is now online. Been thinking about the Web 2.0 article and how this blog is mentioned as a model for blogging yet has a low number of readers. From reading around the subject it seems that 'diggs' and 'reddits' are good for traffic, each post has a 'digg this' or 'reddit' etc link under it so if you do read something you like give us a reddit :)
Any thoughts hints or tips?
2007-01-05
Leadenhall Street London Panorama

Located at 12 Leadenhall Street the Lloyds building's roots hark back to the 1980's building boom in the city and the move towards new technologies in building infrastructure. Completed in 1986 at a cost of £75,000,000 and designed by Richard Rogers, the building is a suitable headquarters for Lloyds who have been trading since 1688.
Across from Lloyds is the Swiss Re building, more formally known as 30 St Mary Axe the building was completed in 2003 and officially opened in 2004. At 180m its inspiration can be traced back to the Willis Faber and Dumas Headquarters built in 1975 by Fosters and Partners.
Click the image to view a larger version, view the Quicktime panorama of Leadenhall Street (2.7Mb), or view other images at the digitalurban flickr group.
2007-01-04
Why is Virtual London not publicly available in Google Earth?
Its a good question and the Guardian Newspaper tackles the issue today in its technology supplement. In an article entitled 'Copyright sinks Virtual Planning' Michael Cross explores the development of the Virtual London model and the issues involved in making it publicly available online.
You can read the article via Guardian Unlimited and if your interested in the issues involved see the blog of the Free Data Campaign.
Interesting times are ahead for the Ordnance Survey, we couldn't of made the model without them and for the time being we cant use it publicly with them..
.
You can read the article via Guardian Unlimited and if your interested in the issues involved see the blog of the Free Data Campaign.
Interesting times are ahead for the Ordnance Survey, we couldn't of made the model without them and for the time being we cant use it publicly with them..
.
Blotter Graph - Tracking Your Technorati Authority
Using a service called 'Blotter' it is easy to embed your level of authroity from Technorati into you blog. We are not sure if this is a good idea or not but it does make for a quick and easy reference page so you can log your blogs growth or decline. Blotter is a new service from Dapper that graphs a blog's popularity over time. The popularity statistics are gathered from Technorati using the Dapper service.
Stats are based on Technorati Ranking over time (start date 05/08/07):

See the Blotter site for how to embed your own graph - its just a case of cutting and pasting one line of html.
See also Technorati's guide to how it rates a blogs authority.
Stats are based on Technorati Ranking over time (start date 05/08/07):
See the Blotter site for how to embed your own graph - its just a case of cutting and pasting one line of html.
See also Technorati's guide to how it rates a blogs authority.
2007-01-03
Temple Bar Panorama

Temple Bar is the last remaining gate of the old City of London. Built by Christopher Wren in 1672, Temple Bar divided Fleet Street and the City of London from the Strand and Westminster. It is infamous as it used to display the decapitated heads of traitors.
It was dismantled from its original location in 1878 and re-erected ten years later in Herefordshire after being purchased by Lady Meux. In 2004 it was moved back to the City of London and now stands between Paternoster Square and St Pauls Cathedral.
The panorama is a reprocessed version of the original Temple Bar post - using High Dynamic Range processing of the RAW file it is possible to extract a noticeably wider exposure range.
Click the image to view a larger version, view the Quicktime panorama of Temple Bar (3.9Mb), or view other images at the digitalurban flickr group.
2007-01-02
Aerial Suburbia Panorama

Suburbia is a surreal experience when your usually based in the city 24/7. The panorama above highlights the quiet estates which are typical of 80's newbuild in the United Kingdom.
Click the image to view a larger version, view suburbia in Quicktime virtual reality (2.9Mb)or view via the digitalurban flickr group, simply login or set up a Flickr account and click here to join the DigitalUrban Group.
Subscribe to:
Comments (Atom)