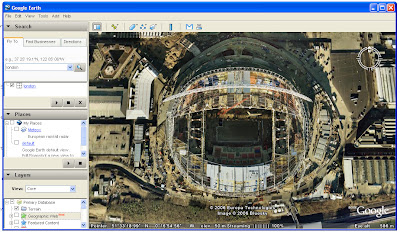
The best movies of earth involve a zoom from space to a ground based location. Obviously with Google Earth we can navigate around the globe but its not so easy to create a movie zooming down to a specific location.
You can always use placemarks but the path is not always the one desired and the framerate can be too fast to capture a movie. It would also be good to be able to use the free version of Google Earth rather than the 'Pro' which has the ability to export movies.
To this aim we found that the best way to control the movie capture is to start from the ground and zoom out - to then gain the impact of zooming from space all you have to do is reverse the movie. In this tutorial we show a step by step method to achieve results similar to the movie below, it should take 15 minutes from starting your capture to the finished result.
To create the movie you will need a few pieces of software, firstly Google Earth, secondly FRAPS (to capture the movie) and finally VirtualDub and Avisynth to reverse it.
Step 1: Local Cache
First of all we are going to do a test run to ensure all the images from Google Earth are in our local cache before we record the movie, this will ensure we don't have to wait for images to download while we are capturing.
 To zoom out smoothly from the earth a good technique is to use the 'double right click' method, this provides a regular zoom level and a smooth method to capture the movie, once we have loaded all the images into cache we are ready to record the movie.
Step 2: Record the Movie
FRAPS is excellent software which allows you to capture at high resolution and high frame rates from any package that uses OpenGL or Direct X. As such FRAPS can be used to capture any movie you wish in Google Earth in real-time, this is not only a considerable time saver compared to the 'Pro' version of Google Earth, it also means you can make movies in the free version.

To record the movie we simply load up FRAPS, note which hotkey to use to capture movies (we use F9) and then maximise Google Earth. Hit the FRAPS hotkey and then start zooming out from your chosen location to space, we recommend a slow smooth zoom using the right double click method which we outlined above.
When you have reached a view of the earth to end the movie simply re-hit the FRAPS hotkey and your movie will be saved. It will of course be a movie zooming out of the earth which is not what we want but it has enabled us to capture smoothly, while controlling the location, something which is difficult when zooming into a view.
Step 3: Reversing the Movie
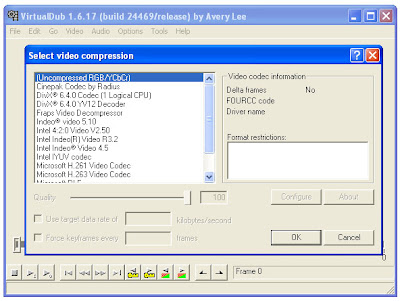
We can reverse the movie quickly and easily using VirtualDub and Avisynth, firstly install the applications and then launch VirtualDub. To enable the movie to reverse we need to take two simple steps, firstly to open the video and save as a uncompressed avi.
 To do this, firstly open the movie and then select 'Video/Compression/Uncompressed' from the tool bar and click 'ok'. Now save your movie by selecting 'File/Save as avi'.
Your movie is now uncompressed and ready to be reversed. This is the final step and requires a small script to be saved and opened in VirtualDub. This again is easy, open up Notepad and cut and paste the following:
AviSource("yourmoviename.avi").Reverse()
Now save this notepad file as 'Reverse.avs' and open it in VirtualDub by going to 'File/Open Video File' and selecting Reverse.avs. Our movie is now shown zooming in from space to our location, click 'File/Save as avi' again and your movie is saved and ready to edit in a movie package such as Windows Movie Maker or to upload direct to YouTube.
If you use this tutorial we would love to know so leave a comment or get in touch via the sidebar.
Others in the 'How to' series include: How to Create an Aerial Panorama from Google Earth and Isometric Pixel Art - Simulating in SketchUp Tutorial.

Neat! I didn't know you could use Fraps to make movies using the free version of Google Earth.
ReplyDeleteI didn't have much success with 'double right click' (surely it produces lots of pauses?) so tried 'touring' between two 'snapshot views' (http://youtube.com/watch?v=JVPkM-0Q6qc), this also allows the viewing angle to be different at the start and end of the zoom. The 'tour speed' is controllable so in theory frame rates should be less of a problem - however my problem was fitting it into the 30 seconds limit of the free version of Fraps.
I followed the tutorial and everything worked until the final step. "Open notepad and cut and paste the following:" - paste to what? I tried saving the notepad file with the AviSource instruction, but VirtualDub would not recognize. Any suggestions would be appreciated.
ReplyDeleteDave. ambergers@sympatico.ca
Davec,
ReplyDeleteThanks for the post... if you cut and paste:
AviSource("yourmoviename.avi").Reverse()
into Notepad and save as Reverse.avs all should be fine (obviously change the movie name to match yours). Also, make sure Reverse.avs is in the same folder as your movie.
Any problems post again and we can find out whats going wrong.. Let me know if it works :)
Cool.
ReplyDeleteI followed the tutorial step by step. Really easy. Work really well.
Thanks for Posting it...
Thank you for the nice post.
ReplyDeleteThanks for this great blog. I just made a new building model and managed to put a movie for those who don't know how to see Google Earth yet. The video is here. Another use that springs to mind is to use this in Second Life to create video shots for presentation purposes.
ReplyDeleteThanks for the post, just what I need for a presentation I've got to give! I've got one problem tho. The file I end up with is 800mb and runs quite slowly/jumpy. Have I done something wrong?? I'd really appreciated any help.
ReplyDeleteThanks
Dave
You save my day with your help to create a movie from google earth. I only used FRAPS, do not need to go to the other software.
ReplyDeleteDoes anyone know why my Fraps video files will not open in Pinnacle? I can play the clips in other programmes but cannot play or edit the AVI files in Pinnacle.
ReplyDeleteHi
ReplyDeleteI just came across your page and will definitely use it. I actually have pinnacle as well, so would be curious to find out if it can be loaded inside P. Thanks very much for the tutorial, it's clear and useful and it help(ed) me a lot !
Patrick
this was really good. i just had a problem when i wanted to use it or even see the video on a computer. i have a windows vista and i dont know how to convert it into a form thats compatible with windows 2000 or something like that.
ReplyDeleteThe link to VirtualDub (http://www186.pair.com/vdub/index.html) is no longer valid. The correct URL is www.virtualdub.org.
ReplyDeleteExcelente! Con fraps se puede obtener un excelente video de google earth. Pero para que funcione mejor, es conveniente arrancar desde el menú en modo DirectX. Ahi toma a 30 fps!!! En OpenGl solo me tomaba a 4fps
ReplyDeletehow do you hide the cursor on the movie?
ReplyDeleteHere's a great little program that will reverse .avi files in one quick step:
ReplyDeletehttp://www.papajohn.org/MM2-Editing-Reverse.html
Was really useful. I could make avi files in a jiffy even without virtual dub. Just a matter of getting used to zooming in i guess. Thanx for the tip. Keep up the good work.
ReplyDeleteGreat program! I have a minor glitch I was wondering if you had some insight into.. when I playback my video it is totally choppy and freezes intermittently. Any ideas how to improve that?
ReplyDeleteGreat tutorial. Note you can zoom in and out of Google earth using the PgUp and PgDwn keys as well. This means you can move the mouse cursor out of the way first.
ReplyDeleteI use Sony Vegas video editing, so reversing a clip is simple..
Followed step by step but VD does not recognize the Notepad file
ReplyDeletehello,
ReplyDeletethere was a mac os software like fraps??? And for Virtualdub?
Thanks GREAT TUTORIAL !!!!
I was able to get a down ward view by just using the right mouse button. First I went all the way down to the building I wanted, my starting point. And then turned off all the layers on the bottom left of the screen. Then right click on the mouse holding it down, move the arrow down ward and the screen will start to climb, how fast it goes depends on how far you move the arrow from the circle. Once you are clear out in space, do not let go of the mouse button, just move the arrow above the circle and you will slowly go down all the way back to the point where you started. Again how fast depends on how far from the circle you hold the arrow. The circle and arrow are on the screen the whole time, but that may not be a problem for some. I thought it was really cool!
ReplyDeleteThank you very much, you saved me tons of hours struggled in after effects, thanks a lot, keep the good work
ReplyDelete