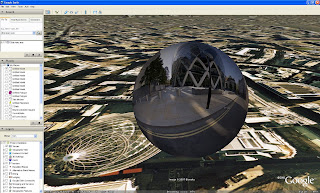
DigitalUrban is pleased to release its Panorama Viewer for Google Earth. The viewer has been created to be as easy to use as possible, all that is needed is a panorama - either from your local drive or via the web at sites such as Flickr - and a single change to the file name in Notepad.
We provide a step-by-step tutorial to create your first Google Earth panorama after the concept movie below which illustrates a series of London panoramas viewable in Google Earth.
To create your own panorama in Google Earth take the following steps:
Step 1
Download the Collada file from our server and save it to your hard drive (320k) - note due to issues with our server mime types it will download as PanoViewer.txt, rename the file to PanoViewer.dae. We will have this fixed asap..
Step 2
Locate your panorama and note down its name or web location, it should be a .jpg file.
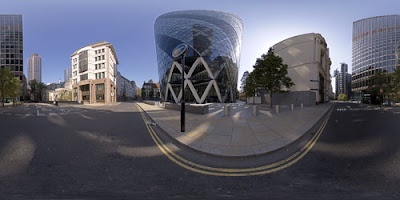
For this example we are using a High Dynamic Range panorama of the Swiss Re building in London. Our panorama is saved at 3000x1500 pixels, higher resolutions are possible its simply a trade off between file size and resolution.
You can download our panorama from here (675k)
Step 3
Open the Collada file 'PanoViewer.dae' in a a text editor, we use WordPad, and locate the following line:
init_from>
Change this to reflect your file name of http address, in our case we change it to:
init_from>
if the file was on the web we would use:
init_from>
Now save this file and open Google Earth.
Step 4
Flyinto the location of your panorama in Google Earth, in our case just above the Swiss Re building.
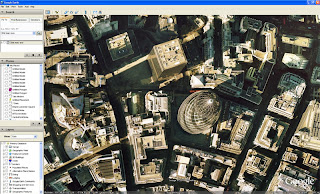
Now we simply need to open the file in Google Earth, you can do this in one of two ways, the simplest is to drag 'PanoViewer.dae' into Google Earth where it will automatically load. The second way is to go to 'File Open' and make sure you have 'Files of Type - All files' selected, now locate the .dae and select it to open.
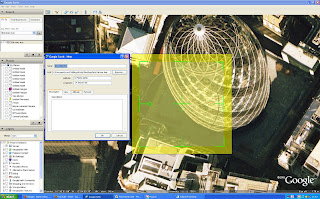 The panorama will open in Google Earth, as pictured above. We now need to move the panorama to the correct location, starting with changing its altitude.
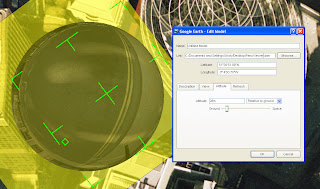
Select the Altitude tab and move the viewer up to your desired amount, we use 28m by default. Now simply drag the panorama to the correct location by clicking and dragging on the centre cross and rotate by clicking on the small green square.

The panorama is now in place and ready to view or save as a .kmz and share. Navigation is best with the SpaceNavigator at the moment as the default mouse view in Google Earth does not allow the user to view around a fixed location, hopefully this will be changed in a later update.
Since posting the tutorial a few hours ago Frank Taylor from the Google Earth Blog has found a great work around for users of Google Earth that don't have a SpaceNavigator. Once you have created the panorama you can add in multiple placemarks which are essentially viewpoints in the scene. To look around the sphere all you need do is click between the placemarks.
You can view the end result of Franks additional viewpoints here (.kmz file).
Let us know if you use the file and if you do a link back to the blog would be appreciated as it all helps spread the ideas...

realized after i'd made earlier post re:source, that it would probably be a dae file. is there a way to modify the geometry to use partial panos, meaning not full 360? or panos that are 360 but equatorial and should not spread to the poles with transparency where no imagery? thanks for your work!
ReplyDeletePartial panos should be possible..
ReplyDeleteI'll take a look and upload a new file/tutorial..
Hey Andy...I like it with a SpaceNavigator. But, it's really hard to use without one. Here's a blog entry I wrote about it:
ReplyDeletehttp://www.gearthblog.com/blog/archives/2007/01/panoviewer_viewing_p.html
Just been at your blog :) Nice post, thanks a lot.
ReplyDeleteIt is hard without a SpaceNavigator, which is a shame, maybe Google will implement a 'mouse look' mode?
Andy
Andy, I just had a thought. When someone sets up the KMZ file they could save several camera view placemarks in a folder showing different angles from within the sphere.
ReplyDeleteOr, better yet, you could set up the DAE file to have several views built-in. That way users without a SpaceNavigator could double-click the different views and see the panorama.
The image is "inside out" on my machine - the writing on the roads is mirror-image, and although it's in London, people are driving on the right :)
ReplyDeleteYour right! As the images are displayed inside a sphere you need to reverse the image before you add it to the file..
ReplyDeleteI'll include that in the tutorial when i update it..
Andy
If you don't have a SpaceNavigator, you can also use your regular mouse with the "Flight Control" navigation mode. (Look in Tools > Options, under the Navigation tab.) Not ideal, but it works very well once you're inside the sphere.
ReplyDeleteBrilliant Andy. I made a short video of your Banksy panorama. Hope that's OK. www.juicygeography.co.uk/blog/?p=103
ReplyDeleteThanks for the post Noel, glad the Banksy image worked. If you use it in the classroom i would love to know.
ReplyDeleteThere is a great view of Snowdon using it here -
http://www.nearby.org.uk/blog/2007/01/15/mountain-panorama-in-google-earth/
I'll put a post up tomorrow about a non-spherical version.
Andy
Hi, Andy,
ReplyDeleteIt's so wonderful, fantastic,...& AMAZING!
I'm a Japanese QTVR creator, and blogger about latest Japanese /World QTVR info .
Of course, I wrote this news (I translated to Japanese) in my weblog after I tried this tech.
http://pencil-jp.net/weblog/data/070117/GooglePano_AgnesIllumination.kmz
Akila,
ReplyDeleteThanks for the info - nice panorama, I will add that to a future post detailing all the locations.
I'm off on a lecture tour of Japan next week actually, more on that in a future post...
Andy
Had a go with this and created a horrid looking thing. Then realised that the width should be x2 the height in a panorama - doh! Works well now, would be useful to note this in your tutorial.
ReplyDeleteHopefully will be using your photo bubble in some Uni teaching in March, will keep you posted. Thanks for releasing it, excellent work!
Andy
ReplyDeleteanother excellent article, thanks for the idea and the tutorial. I would suggest though that rather than having this set up so that mirror images have to be used, can the collada file be modified so that it maps the texture the other way around? That way anyone using this will be able to use the same image for GE panos as for conventional pano viewers like SPiV or PTViewer.
Phil
Dave,
ReplyDeleteHave you got the latest version of GE - ie version 4? That should sort it - if not try the spheres on the blog and let me know if you can view them.
Phil,
Good idea! I'll take a look...
Andy
Is there an application where I can see all the spheres made without making them myself? If there isn't, will there be one?
ReplyDeletei've found a nav mode that seems to work well for a pc w/scroll mouse. wrap kml around the dae with the model tag, within model use link to dae, location of lat/lon/alt/altmode. put that all within a placemark tag which includes a lookat tag with the identical lat/long/alt/altmode and add range tag of 40 and tilt of 90. after loading, box click the kml and double click the pano and you'll be driven into position. holding scroll wheel down and moving only in X axis the pano will spin on Z axis nicely.
ReplyDeleteAny workarounds for panoramas that don't include all of the sphere? I guess I could add a transparent border in Photoshop?
ReplyDeleteVisit ==> www.mycameraworld.blogspot.com
ReplyDeleteAnother way of doing it is used on panoramicearth.com
ReplyDeleteThat looks really cool. Many of us in the equirectangular group on flickr post geotagged 360 x 180 photos. Maybe you could modify your script to automatically include all of the photos in our map. (e.g. http://www.flickr.com/groups/equirectangular/pool/map?mode=group)
ReplyDeleteIf you find a way please post a link in our group. We would love to have you join.
http://www.flickr.com/groups/equirectangular
These comments have been invaluable to me as is this whole site. I thank you for your comment.
ReplyDeleteHi Andy
ReplyDeleteOne word: Amazing!
I'm not so technically gifted as most of your readers and I still cant figure out how to view my cylindrical images in GE.
Sorry for the trouble, but please help. I have quite a view very nice panoramas of South Africa and would love to create a KZM file and share it with the world.
Regards
Tinus le Roux
Hello Andy!
ReplyDeleteI have a problem with the new version of GE
Google Earth
5.0.11337.1968 (beta)
It does not show the sphere!!!
Regards
Zsolt
Your right! Its a reversed face sphere so it must be something to do with either the texture mapping or the faces.
ReplyDeleteI'm going to have to go back to square one and try and see whats going wrong...
Thank for the heads up,
Andy
Hi Andy,
ReplyDeleteI tried this today, and I do not get a sphere either with Google Earth 5.0.11337.1968 (beta) I'm not sure how old the last post was, but did you manage to get it working. Am so pleased I found this last post, because I've been scratching my head for last hour.
Look forward to hearing from you.
tom
Tom - it seems to be broken in the latest version of GE.
ReplyDeleteI'll look into it...
Hi Andy,
ReplyDeleteThats very kind of you, I know you are always busy bringing great content n'all. I will get hold of an older version of GE and try on that, so no hurry mate :)
Cheers,
tom
Hi Andy,
ReplyDeleteWondering why the sphere is not visible in version GE 5.0 pro. Any help would be very helpful. Thanks.
I have a problem with the Google Earth 5.0.11733.9347 pro showing the sphere. Is there a problem with the code?
ReplyDelete