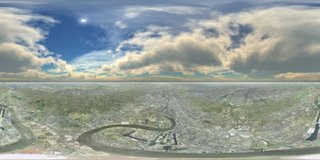
Peter Murphy (one of the leading lights in the panoramic world) sent us a email on Monday with the thought of creating panoramas from a Digital Earth. The concept is simple - grab a series of screen shots while rotating above the earth and then stitch the images as if they were normal photographs.
A day is a long time in Internet based tutorials and this is now an update of the original as a result of Gaby, a digital urban reader, writing a kmz tool to dramatically simplify the process of capturing screen shots. The whole process should take approximately 40 minutes.
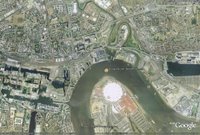 The first step is to go to Gabys Kmz Panorama Capture Tool and type in the Lat/Long of the location you want to capture - in our case above the Millennium Dome in London.
To create panoramas it is important to rotate the camera around the nodal point of the lens in order to minimise any parallax error as the scene is captured. Previous to Gaby's tool the best way was to use the 'Flight Simulator Mode' by clicking 'Ctrl-G'. Combining this with a 'left mouse click and drag' action you can look around the scene and thus simulate a panoramic camera.
You can now simply load up the kmz file which is output from your Lat/Long co-ordinates and a series of placemarks are presented in the Google Earth, each representing camera locations. Select each placemark and wait for the streaming in Google Earth to reach 100%, now use File - 'Save Image' and call your image image1.jpg. Go through this for each placemark and you should end up with 28 images, each saved in sequence - ie image 1.jpg to image 29.jpg.
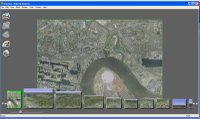 Once you have your numbered screengrabs you now need to stitch them, we used Stitcher from RealViz, you can download a trial version from the RealViz website. If you are a PTGui user we have created a Template to automatically stitch your images. Download the Template and follow these steps:
1) Open PTGui and click Select Source Images - Navigate to where you saved your screengrabs and select all of them.
2) A Camera Lens Dialoge will appear, simply click 'Cancel'. Your images will then load into PTGui.
3) Click File 'Apply Template' and select the location of the GoogleEarthTemplate.pts saved from above.
Your images will now automatically align, you can now complete the process by selecting the 'Advanced' button in the top right hand side of PTGui and then 'Create Panorama'. Save your panorama as a Tif, we normally output at 6000x3000 pixels. Advanced users of PTGui can add their own Control Points and stitch as normal, lens parameters should be 30mm Rectilinear.
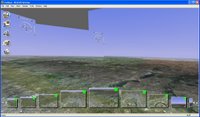 To stitch the images you can also use the AutoStitch feature of RealViz to simply load in the images and automatically create a panorama. It should be noted that the curve of the earth will not stitch perfectly due to parallax error resulting from the Flight Simulator mode of Google Earth, the image left illustrates this (click for a larger version).
Fixing the parallax's error is simply a case of slightly cropping off the top of the resulting panorama to give us the image as below, this applies to both PTGui and Realviz Stitcher outputs:
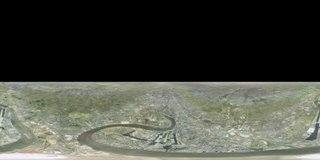
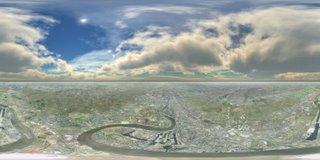
As Google Earth doesn't include clouds we can now add them in as a new layer in photoshop. We used a panoramic image of clouds from TurboSquid, these used to be free but are now $5 each. If you don't have a cloud panorama then you can always create your own using Terragen, there is a great tutorial on how to do this here.
Adding the clouds gives you the final panorama over London (click for a larger view) :
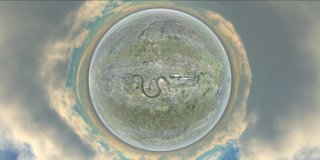
Changing the projection of the resulting image allows a number of views such a hyperbolic image of London from Google Earth:
Finally to create a Quicktime Virtual Reality scene from the image - so you can look around the panorama - download Pano2QTVR.
The resulting QTVR can be viewed here (2.8Mb).
Of note in the final scene is how the Google copyright crops up in various places in the image. This is due to each screengrab containing the Google overlay and depending on the overlaps some are automatically blended out in RealViz and some remain... *update - using PTGui all copyright seems to be removed, this opens up the question on the legality of creating panoramas? *
Peter has used NASA's Worldwind to the same effect, see here for his panorama of the Southern Highlands (Quicktime format).
If you create any panoramas using Google Earth we would love to hear from you...
Panoramas submitted so far cover
London, New York, Moscow, Belgium, Paris and Sydney.

Hello,
ReplyDeleteI made one above Brussels, Belgium:
http://www.vanbelgie.be/brussel/brussel.html
No clouds (yet).
It works great, but what about the Google Earth copyright??
Gr Bruno
After several tries with the flight simulator mode, I've made a small program that generates a kml with all views needed.
ReplyDeleteYou just have to input lat, lon and pov altitude.
URL : http://tracks.landais.org/panokml.php
Source :
http://tracks.landais.org/panokml.phps
I still have trouble to stitch images...
Cheers
Gaby,
ReplyDeleteThat is genius! I'm giving it a go now and I'll include it in the tutorial if it works :)
I'll also put some more pointers on stitching if that helps..
Andy
Gaby,
ReplyDeleteThanks again for the excellent tool. I've updated the tutorial and included a template for PTGui so your images should stitch now..
Let me know how you get on..
Andy
I've just tried with Autostitch. I've unchecked Auto Straighten and Auto Crop and it works great with Pano2QTVR!
ReplyDeleteOuch! Sounds like desinventing Google Earth! Why make "panoramas" if we have "original" 3D world?
ReplyDeletePanoramas allow you to simply look down and rotate with the image in a way thats not possible in GE. They also make great prints!
ReplyDeleteOur server seems to of fallen over btw.. all the cities apart from London will still work. It will be fixed latest of Monday..
Andy
These are wonderful. I couldn't help but notice the similarity of these to this painting in Paris' D'Orsay Museum:
ReplyDeletehttp://smallerdemon.com/images/displayimage.php?pos=-945
Oh, well, let's try another way of posting that. :)
ReplyDeletehttp://tinyurl.com/rw4yr
That's the painting I was talking about. I'm sure someone here might actually be able to recognize it and tell us who painted it. I think the name of it is "Paris From A Balloon".
andy:hi
ReplyDeleteI can't download the
Template,GoogleEarthTemplate.pts
polease give me a help
Sorry about the template link, turns out out network was being upgraded.
ReplyDeleteIt should all be working now :)
Andy
a couple of questions:
ReplyDelete1) i get 29 images from the (brilliant) script. should i not be using the one from "circle 0"?
2) your images seem to be horizontal in nature. mine come out square. might this be because i am on a mac?
3) when i do "save images" i am presented with a number of choices (i have the pro version) should it be "screen capture only" or one of the higher resolution images? does this relate to my previous question?
4) for creating the QTVR pano, has anybody out there tried to do it with VRWorx? any success?
thanks
i think i figured out #2 - is it because i have preferences --> detail area set to medium, when it should be large?
ReplyDeleteHello,
ReplyDeleteThanks for Andy's great tutorials and Gaby's excellent script to generate KML.
Here is the QTVR (view from outer space) I created:
Taiwan
http://www.golden360.com/ge/taiwan.htm
Images sources: Google Earth & NASA web sites.
Mike
Hi,
ReplyDeleteGreat Aerial Panorama Tutorial!
I had created 2 Panorams,
Taipei
http://taipro360.googlepages.com/Taipei_K-Blvd.htm
Beijing
http://taipro360.googlepages.com/Beijing.htm
About the sky,
I was used Photoshot plug-in "Four Seasons".
http://www.luminous-landscape.com/1photo-pages/4_seasons.shtml
It's usefull then "TurboSquid", I think.
Thanks!
Walker - thanks a lot for the links, glad you liked the tutorial..
ReplyDeleteI've put up the image of Taipei if thats ok - very nice :)
I have the same questions as dni:
ReplyDelete1) i get 29 images from the (brilliant) script. should i not be using the one from "circle 0"?
2) your images seem to be horizontal in nature. mine come out square. might this be because i am on a mac?
Circle one is the down shot so yep you need to grab a screen from that as well.
ReplyDeleteIf you use PtGui and the template it should all stitch into place and provide a image similar to our London Google Earth panorama. This works on both Mac and PC.
Not sure why yours is square but if you email me an example I'll take a look and we can sort it out :)
Andy
Can you please republish the GoogleEarthTemplate.pts - the link seems to be broken
ReplyDeleteCheers
Sorry about the broken template file its being blocked by our new server. I will have it fixed tomorrow :)
ReplyDeleteThe template is back online, apologises for the downtime..
ReplyDeleteAndy
It seems that Gabys Kmz Panorama Capture Tool at
ReplyDeletehttp://tracks.landais.org/panokml.php no longer exists.
Is there any tutorial out there how to calculate placemarks for panoramas?
The link to the http://tracks.landais.org/panokml.php still seems to be broken, any chance of this app being made available!
ReplyDeleteThanks John
Sorry, it's back!
ReplyDeleteDefault result in Google Maps :)
ReplyDeleteThanks Gaby,
ReplyDeletefor reactivating Panorama Capture Tool.
Hi all,
ReplyDeleteI have use this tutorial to produce one aerial panorama of a french city, Limoges, it is hosted here:
http://www.photoglob.fr/limoges360/aerial/
Congratulations for all the others panoramas posted here.
Vincent Ogloblinsky
everything works except the tutorial on the sky :(
ReplyDeleteGreat piece this, Im only a beginner and its good for practice, cheers.f
I have made an anaglyphic stereo 3D-panorama with Google Earth that is supposed to be watched with red/blue glasses.
ReplyDeleteIt is a cylindrical panorama from El Cap in USA.
Here is the panoram (9 MB):
http://members.chello.se/janmelin/ElCapPanoAnaglyph.mov
And here is the kml-file:
http://members.chello.se/janmelin/ElCapPanoAnaglyph.kml
Jan Melin/Sweden
When I use Gaby's program, I get 29 placemarks - so, I end up with 29 images. Why do your instructions say 28?
ReplyDeleteYour right Frank - the scripts been tweaked so its now 29.
ReplyDeleteThe tutorial has been changed accordingly :)
Andy
Does anyone else have a problem with the lat and the long. When I get the coordinates from GE and the enter these into Gabys Script and then click on the circle O placemark one I go to another location a long way from the location I want to see.
ReplyDeleteI must be doing something wrong, can someone give me a lat long that has worked I have tried entering the lat long in varies formats none work.
Thanks
When I enter the coordinates, then I also end up somewhere else arround 25 km to the west.
ReplyDeleteThen I try with different number until I get close.
But since we are only 2 who have problems, we must do something wrong?
BTW a very good tutorial. I am using the panos for crimescene presentation.
Claus.
I live on lat 56.03.00.23 lon 9.59.15.80, which does not work. I end up 25 km to the west.
ReplyDeleteAfter 20 or more attempts I came up with these numbers that found my place 56.0501 and 9.9878.
Normally when you count in degrees you go to 60 and start from 1 there after.
Maybe it is here the problem is hiding.
Hi Gaby, can you reactivate the Panorama Capture Tool? It is a great tool, but now it doesn't work : The resultant pano.kml corresponds to another place ??. What do I have to do to postion myslef in the place wished..Thank you.
ReplyDeleteLuis
Good design!
ReplyDeleteHi,
ReplyDeletecan I translate this tutorial into German? It ist great.
Benni
Benni..
ReplyDeleteOf course!
Andy
Thanks for article!
ReplyDeleteIt doesn't really work with "terrain" turned on. This make panos in mountain areas really out of the question.
ReplyDeleteAlso, the kml file now outputs 41 images.
@Claus. You need to input decimal degrees (DD) rather than degrees, minutes, seconds (DMS). There is an option in GE to change to DD.
ReplyDeleteI just converted your DMS to DD. You were close. The right answer is:
56.050064° Latitude
9.987722° Longitude
And here's another one:
ReplyDeletehttp://tinyurl.com/ypwwe6
Above the beautiful city of Mechelen, Belgium.
Thank you very much for this tutorial. For some reason, the template didn't work out, but i managed to stitch things together manually.
And another one above the inspiring city of Antwerp, Belgium.
ReplyDeletehttp://tinyurl.com/3xmqfc
Hello,
ReplyDeleteI made one over Lecce in the South Of Italy.
http://www.lecce360.com/aerial
Thankyou
dp
the kml file now outputs 41 images;
ReplyDeletethe PTGui template does not match :-(
This comment has been removed by the author.
ReplyDeleteThanks for the great post. As others have pointed out, the current version of the panokml script provides 41 sets of coordinates.
ReplyDeleteThankfully, Archive.org has retained a copy of the older, 29 image script. You can find it at by heading on over to http://www.archive.org/, and searching for 'http://tracks.landais.org/panokml.phps'. Choose the Feb 21st mirror.
Of course this means you need a PHP enabled web-server, but finding a free host if you do not own one should be fairly easy.
Enjoy, and thanks again!
This is a great concept of panoramic photo!! I've tried it out and have some demo in:
ReplyDeletehttp://www.caloliaire.com/ge
-Now I'm trying with terrain and also 3d buildings, it seems to be a bit more difficult but everything is possible...
How to use it in a comercial way??
enough with adding google logo, somewhere over the sky??
Hi,
ReplyDeletecan anybody PLEASE help me, i cant get the hyperbolic image. I got the normal panorama like seen above. But i'm too stupid to manage the hyperbolic view.
Is this just a setting in the PTGui? or is this done in the photoshop with a plugin?
please help,
Florian
Hi,
ReplyDeletecan anybody PLEASE help me, i cant get the hyperbolic image. I got the normal panorama like seen above. But i'm too stupid to manage the hyperbolic view.
Is this just a setting in the PTGui? or is this done in the photoshop with a plugin?
please help,
Florian
wonderful tutorial!!!
ReplyDeletehttp://www.panoramio.com/photos/original/13071218.jpg
Very cool...I also wrote about how to create panoramas of your digital pictures using free software. Hope it helps!
ReplyDeleteHi,
ReplyDeleteIs there any chance of getting a new Gabys Kmz Panorama Capture Tool up that works with the PTgui script? The tiling is all wrong with the current combination.
Cheers,
Kim
Yep i will have a look and create a new script - ptgui should stitch without the need for a script as well, if you simply load them it should happily stitch them.
ReplyDeleteI'll report back when i have something.
Andy
Please update the script
ReplyDeleteis there any plugin that could like youtube, where u can load adsense, related thumbnails of panoramas and etc..??
ReplyDeletegreat tutors. thanks for it.
ReplyDeletehi,
ReplyDeletethe kml script is not worinkg properly. when I clicked to one of the points, in goes lower and hit the floor. so no view can be seen. can you fix this? thanks alot for the job...
ozgur
" Previous to Gaby's tool the best way was to use the 'Flight Simulator Mode' by clicking 'Ctrl-G'. Combining this with a 'left mouse click and drag' action you can look around the scene and thus simulate a panoramic camera.
ReplyDelete"
I think that instead of the above, you can use CTRL+cursor buttons to rotate around the focal point. Press ALT, too, and the rotation will be slower. All this for manual camera positioning.
It seems Gaby's tool no more exists. When I click the link it opens a porn web site! Is tehere any solution to get kmz panorama capture?
ReplyDelete