There are a number of newly emerging paths into Oblivion - most notably via the free version of Google SketchUp and Blender, we will be covering these over the coming weeks. This tutorial is aimed at exporting from SketchUp Pro to 3D Max and finally into Oblivion although any import method into 3D Max will work.
For this tutorial you will require:
1) SketchUp Pro - A fully functional 8 hour version can be downloaded from here.
2) 3D Studio Max - A 30 Day fully functional trial can be downloaded here.
3) Nif Tools Exporter for 3DMax - Blender and Maya are also available from here.
4) Convim - A image conversion package to convert files to the .dds format allowing you to import textures. Download via the Convim site.
5) A 3D Max script to change image settings - Part of the BlurScripts pack which can be downloaded here (zip file).
In our case we will be converting our model of the Quad at University College London to Oblivion - this is used as an example due to it high number of textures allowing us to detail how to process complex models:
 Step 1
Open or create your model in SketchUp and export to the .3DS format. Ensure that the model is exported as a single object with generate cameras unticked.
Step 2
Download the Nif Tools Exporter for 3DMax and extract the two files - NifPlugins.dlu to the 3D Max Plugins directory and MaxNifTools.ini to the Max Plugcfg directory.
Step 3
Download the Blur Scripts file and extract the folder 'BlurScripts' into your Max Scripts directory.
Step 4
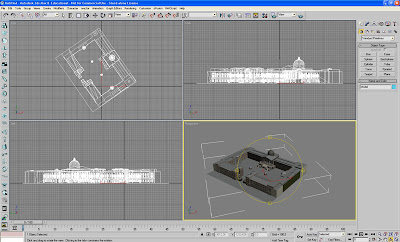
Import your model into 3D Max choosing to 'Completely replace current scene'. You should see your model within 3D Max:
Step 5
Make sure your model is grouped into a single mesh. If not group your object and then right click 'Convert to Editable Mesh'.
Step 6
We need to find and replace all the texture file names within 3D Max to the .dds extension (the format that imports into Oblivion). Click 'MaxScript'/'RunScript' from the top tool bar. Navigate to the BlurScripts folder and select 'ChangeBitmaps'.
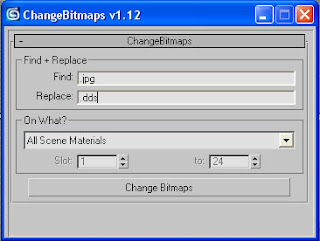
In our case we want to change .jpg to .dds for the files we will create later using Convim. Type .jpg and .dds into the relevant dialogue boxes as pictured above and click 'Change Bitmaps'.
Step 7
Export the file in Nif format - Click 'File\Export', select File Type Netimmerse.Gamebryo .kf .nif. Navigate to your Oblivion folder and then onwards to \data\meshes. Type in your model name, in our case UCLQuad.Nif and click 'Save'. An export box will appear as pictured below:
Select the options as pictured and click 'Export'. You model is now saved in the .nif file format ready for import into Oblivion.
Step 8
Before we import into Oblivion we need to convert the texture files to .dds format. Open Convim and select your model texture location on the left using 'All'. The file conversion should be set to DDS DXT1 Texture with the folder path to Oblivion\Data\Textures as pictured below:
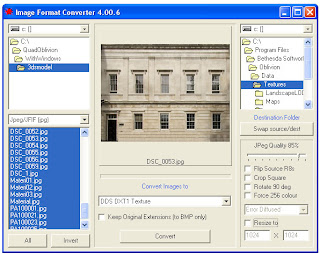 Click 'Convert' - you now have the model and the textures in the correct format ready to import.
Step 9
Open the Elderscrolls Scrolls Construction Set and select 'File\Data'. We will be using the files created in Part One of this tutorial - in our case we created DigitalUrban.esp. Firstly double click Oblivion.esm and DigitalUrban.esp (or your file name) a cross will appear next to the files. With your file name highlighted click 'Set as Active File' this ensures that your world loads correctly into the construction set. Click 'OK' and your world will load.
Step 10
All we now need to do is simply open our World Space and import a new object. In Cell View scroll down until you find your worlds file name - Select it (again in our case Digital Urban) and double click in Cell1 where we will see the tree we placed in the first part of the tutorial. Double click the tree and then click the 'Lightbulb' icon in the top tool bar to ensure you can see it.
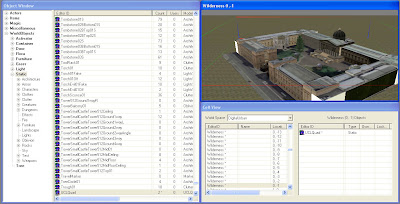
You screen should now look as illustrated below:
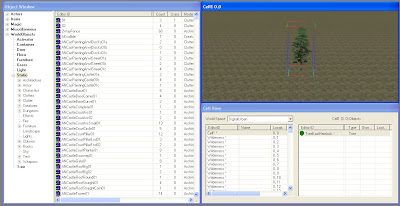
In the Object Window - on the left - select 'Static' and right click on any object name in the list, Select 'New' and type in a ID into the option box, in our case UCLQuad. Click 'Add Nif File' and choose your model saved out of 3DMax. Click Ok.
The model is now ready to be added to the scene.
Step 11
Scroll down the list until you find your newly created ID file - click and drag it into the render window next to your tree. You model will now appear fully texture mapped into the editor:
 Finally - Click 'Save'.
Step 12
Launch Oblivion - you are now ready to view your world. Select 'Data Files' from the Oblivion start screen. A menu will appear allowing you to load your new world. Select 'Oblivion.esm' and 'YourWorldName.esp' - ours is DigitalUrban.esp. Click 'OK' and Play' from the main menu.

The YouTube Movie below demonstrates our final world created by following the above steps:
Note that when the world first loads the graphics are flicking and the sky is displaying errors.
This is easily fixed by:
Step 13
Press the key next to 1 on most keyboards labelled '¬' or '~' this allows console commands to be entered. Type 'TS' and then 'Press Enter' now repeat and you will see that the sky is now correctly turned on. There are a number of commands you can use in this mode to turn functions such as Flying, God Mode and Weather Effects on and off, see GameSpots guide for a full list.
Step 14
Press 'T' to allow you to advance in time - towards daylight, select 10 hours.
Your world is now complete and navigable within the Oblivion Engine. Use W/S to move forwards and backwards, A/D to move left and right. Press 'R' for a third person viewpoint.
We hope that the path from the first movie in the tutorial towards the image of the Quad in SketchUp and finally the movie of the Quad in Oblivion makes the point of how powerful game engines can be for visualisation...
Hi Guys
ReplyDeleteI followed your instructions closely in part 1 and part 2 and was having problems right from the get go. The Tes Construction set would freeze up when saving the height map and the scripts and programs I was told download would not work properly. Thanks for effort but this have been a frustrating experience for me. If you can help me out I'd appreciate it. thanks
Thanks for the comments.. to help we will upload the files from part 1 allowing you to load up with the flat starting land in place.
ReplyDeleteThis will get around any freezing on the height map.
The scritps etc should all be ok but if let us know any problems we can help you through it..
All the best,
Andy
Hello, it's great to see such clear instructions out. :) I've started to import models from 3DS Max 8 to Oblivion but I haven't succesfully made a collision mesh that isn't affected by the "collision bug" (something about custom collision models crashing the game).
ReplyDeleteI would love it if you could adress this please (assuming you've found a solution?)
Keep up the good work!
The nif exporter seems to keep crashing when i export a model. Do you know any way around that?
ReplyDeletei'm having the same problem but from a month your scenes that u sad u will upload it somewhere didn't apear...it's such a secret to share some stuf with other people...?at list when u say something do that thing not replying that u will ...next year maybe
ReplyDeletesorry, but i'm frustrated about all the bugs i'm getting..and your scene could help geting my files sooner in Oblivion
Anon,
ReplyDeleteSorry to hear of your frustration - importing can be a tricky process if you get stuck.
Send us a email and we will hlep you sort it - either by uploading any files or providing some more guidance...
Our email is on the top right of the blog btw...
Hope to hear from you soon..
Andy
Thx for replying so quickly...
ReplyDeleteI managed to do the first scene...done that
I managed to export my model to nif format as u sad...done
But when i try to imported to TES the game is over... I tried to import less complex model as u sad and it works...so the problem could be the complexity of my model..in your tutorial u used a very complex model and mine is less complicated but the geometry that's generated from import export i think is the real problem...any advice how to clean up 3ds model so it could be exported to TES with no problem?
Thx!
I have a problem in the step 6 of the part 2.
ReplyDeleteI follow de instructions, but my 3dmax 8 show me this message
--compile error: Can't find the include file: $scripts\Blurscripts\BSlib.ms
-- In line: include "$scripts\Blurscripts\BSlib.ms"
I need this this archive right ?
were i find ?
Where did you upload the files from part 1?
ReplyDeleteSorry to dig out such an old thread, but I just found that the Nif exporter works with discreets gmax also which is freely available on turbosquid so no need for 3DSMax if you're on a tight budget...
ReplyDeletehow do I make it so I cannot walk through my models. I want my objects to be solid so that I can walk on them, and not through them. E.g. If i make a modern looking house exterior that I want to use in the game, i dont want to be able to walk through my house.
ReplyDeletegreat tutorial and I have reached the emd but my model is purple. At first i thought it was the .tga file so i converted to .dds. any idea what I could be missing?
ReplyDelete