
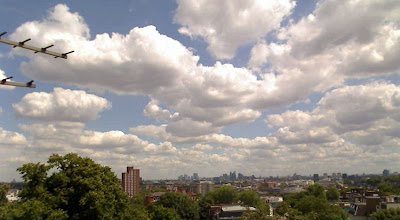
 Over the past few months we have been running views of the city created from a webcam mounted on our roof looking over the London skyline from Camden Town. The setup, although remarkably simple,
  is capable of capturing high definition timelapse movies at a fraction of the cost of off the shelf hardware.
Here at digital urban over the years we have got used to setting up capture systems that are low cost yet get the job done, and our timelapse system is hopefully no exception.
You will need:
1 x WebCam - we recommend the QuickCam 9000 due to its 1600 x 1200 resolution but any USB webcam will do.
1 x Waterproof Torch - see the photograph below, any torch that is generally waterproof is suitable, ours cost £9.99.
1 x USB Extender Cable - depending on length required, £15.00
1 x Roll of Electrical Tape
1 x Old Sock
1 x Webcam Capture Software, we used Booru Webcam 2.0 , £0.
Time Required - One Hour.

Step 1: Mounting the Webcam
The key is to house the webcam inside the torch, thus creating a unit you can leave outside in all weather while still capturing images. As such the first step is to take the torch apart, remove all the internals, unscrew the front section and pull out the reflector.
The webcam is housed inside the reflector, where the bulb used to be. To allow a snug fit simply thread the USB cable of the webcam through the hole where the bulb was and pull so the webcam is secure inside.
We tried various methods to secure the webcam but the best is to allow it to simply sit on top of an old sock, this allows the cam to remain tight in the housing while also allowing last minute adjustments. We know it sounds very low tech, but trust us it we reached this conclusion after hours of trial and error with a lot of glue and fixings.
Step 2: Wiring it Up
Drill a hole in the base of the torch and thread the USB lead through, screw back on the glass front and you are done. You should now have a torch with a webcam inside complete with a USB cable coming our the back.

Our webcam sits on the roof with the cable running down to the eves and coming into the house through a window. Our run is approximately 10 metres so we have linked up the end of the USB of the webcam to the computer using an Active USB extender.
An active USB extender is designed to allow cable runs over and above the usual 5m limit. Multiple leads may be connected up to a maximum of 3, giving a maximum cable run of up to 20m (with three active and one standard lead). We simply plugged the USB cable into the extender and wrapped the connection in electrical tape to keep out the rain.
The webcam is ready to go and ready to mount wherever has a good view. The torch we used is useful as it has a stand allowing it to point at the sky or to be mounted on a ledge. Ours is secured to a chimney pot using regular cable ties.
Step 3: Capture the Images
Timelapse images work by capturing a image few every few seconds and then stringing together the sequence to produce a movie. Our webcam is linked up to a Eee PC running Windows XP, the laptop runs almost silently which is a bonus as most timelapses run for many hours.
There are numerous software packages for capturing timelapse images, we used Booru WebCam 2.0 as its both free and one of the best available on the Windows platform. For Mac users Gawker is a free and extremely easy option to use, although note the QuickCam 9000 is not Mac friendly, it is worth taking a look at the Logitech Vision Pro instead.
The general rule is to capture an image every 5 or 10 seconds in .png format for minimum loss of quality. The images are saved in sequence ready to be merged into a usable movie, we store ours on a portable hard drive as it is all too easy to run out of disk space when capturing every 5 seconds over a 24 hour period.
Step 4: Create the Movie
There are many ways to create a movie from a series of images. The simplest way is to use QuickTime Pro which allows one to open an image sequence (file > Open > Image Sequence), set the framerate (normally 24 frames per second) and save. If you don't wish to use QuickTime Pro then take a look at this easy to follow tutorial on using Windows Movie Maker.
Below is an example movie captured using our set up. The frames were captured as detailed above, opened in QuickTime Pro and then simply saved at 1280 x 720 for upload to Vimeo. The whole process takes approximately 15 minutes.
London Summers Day from digitalurban on Vimeo.
Music: Ghostlight
The aerial is in view throughout the movie above, as such you can use the digital zoom function on the webcam to zoom past the aerial, allowing a clearer view of the skyline. The movie below was created using the digital zoom:
London Clouds Timelapse, November 23rd 2008 from digitalurban on Vimeo.
Music: Let it Rain
If you do install a webcam in a torch and create a timelapse movie do let us know and any thoughts/question are of course welcome via the comments below.
Update - see our post on GIS Timelapse for Pedestrian Movement Analysis for an example using the Booru webcam software and timestamped images.
Hey, thanks for great tutorial, I made some use of that, effects are for your view at:
ReplyDeletehttp://www.youtube.com/watch?v=QnCh2xQnVLU
Great guide and work! a suggestion - what about creating a KML and insert the Flash objects (videos) where people incl. you have filmed (lat/Lng) the timelapse video?
ReplyDeleteNice example Tomesh - I've put the movie in a blogpost looking at your methods.
ReplyDeleteSoren, good idea to create a KML of timelapses, could simply pull them in from YouTube..
Brilliant. I've been mucking around with webcam timelapse stuff as a way of visualising temporal patterns in the environment. This rig / housing is an excellent solution, I'll use it next time I do one of these projects.
ReplyDeleteI'm using the 9000 under all weather circumstances; rain, sun, heat, frost you name it, it can have it.
ReplyDeleteI'm using webcamxp, record every minute and use quicktime for the time lapse.
Great to see the almost same setup, but then with a view like yours.
Enjoyed the videos.
How much could you get away with charging someone to set up a rig like this?
ReplyDeleteLove the London Clouds Timelapse video. Brilliant stuff
ReplyDeleteThank you so much... just to clarify though: A torch is just a regular old flash-light???
ReplyDeleteYep its a simple flashlight :)
ReplyDeleteAmigos aqui temos um tutorial de como fazer um video usando a técnica do Time Lapse utilizando um celular Nokia N95 8GB.
ReplyDeletehttp://www.ramalhoblog.com/time-lapse/
I want to do this when snow is falling. Will chem' heater ove heat the camera?
ReplyDeleteI've tried booru on 2 windows 7 machines. The first one crashed often and the 2nd crashed always.
ReplyDeleteI had the same problem, it went away after I uninstalled, and re-installed, making sure that I run the installer with "Run as Administrator" not just simply executing it.
DeleteTry it, it may work for you as well :)
Ciao!
ReplyDeleteThanks for the good info!
I have a little problem...
I've installed Booru, on win7, but cannot find the option to save sequence of images, it keep saving over the old one...Does'nt not increase the number of the file...any help?
Thanks!
Alekbom!
write %i after the path, for example: C:\Cam\9000\image%i
ReplyDeleteIt works here and running fine on W7 64
I used Yawcam to do the capture and it worked just fine... and free...
ReplyDeleteThanks a lot for this! I'm currently making a time-lapse of a metal object rusting in a cup of salt water.
ReplyDelete