


Summer seems to be a good time of year to dig out those movies that we have liked over our time on digital urban so far. First off we are going to look at our own movies (its slightly indulgent) that in the 1500 odd posts often get lost, we will run through why they were made, the software involved and their place in the bigger picture.
Full post with movies after the break below:
Showing posts with label Best Of. Show all posts
Showing posts with label Best Of. Show all posts


2008-02-15
Best Of?
We are making some cosmetic changes to Digital Urban, one of which is a 'Best Of' section. With over 800 posts its easy to lose some of the most read/commented entries so some time next week we will have the 'Best Off' section up and running...
Till then its down to the normal links on the right hand side.
2007-09-27
Virtual Worlds Circa 1998: How Much Has Changed?

Second Life, collaborative working, voice chat and others of the Web 2.0 world are so of the moment but the concepts were also all the rage in 1998. This post takes a look back to the day when if we had money we would have invested in virtual worlds - the next big thing.
Hindsight is however a good thing as most of the worlds that showed potential in 1998 were lost when the web bubble burst, but if you think Second Life is new we think its just picking up the ideas from a decade ago.
Voice Chat
Second Life has just enabled voice chat within its virtual world browser, a system called Onlive integrated real-time voice-based communication in VRML (Virtual Reality Modelling Language) environments. A screenshot of our use of Onlive is pictured below, note the Netscape icon in the toolbar to date the image:
 To communicate the user was required to press the ctrl key on the keyboard and talk into a connected microphone. The user's voice was then encoded and transmitted into the virtual environment using automatic voice synthesis and three-dimensional audio. The result was real-time conversation with lip synchronised avatars.
With the emphasis on lip synchronisation the avatars were represented as single floating heads which limited to some extent the level of perceived interaction with the environment. To be honest the three dimensional scenes were merely backdrops and the quality of the audio was often poor resulting in dropouts and confused conversations. Indeed, the most widely used phrase in Online was 'pardon', although at least in was in three-dimensional audio.
White Boards and Integrated Powerpoint
Integrating whiteboards and powerpoint presentations is a central part of Second Life, especially for its use by business and academic communities. Setting up a powerpoint presentation takes time and requires scripting, Holodesk however had it built in.
Holodesk was a VRML 2.0 based shared virtual environment from a Pittsburgh-based company called Telepresence. Voice chat was also built into the system but limited to two users at any one time compared to the multiple voice communication of Onlive. Notable additional features were the ability to communicate via shared whiteboards and views prepared graphic slide-based presentations within the virtual environment.
Pictured below is a section of our London work in Holodesk (we were experimenting with scale):
 A key limitation of using VRML for multi-user worlds was the inability for any changes to the world to be saved. In essence a VRML world was a scene which although offering some level of interaction did not involve any level of collaboration.
Collaboration and Tool Box Building
If we had bet on any technology system becoming main stream it was the ActiveWorld's browser, back in 1998 it did most of the things now possible in Second Life.

ActiveWorld's was not by any means the first Virtual Worlds system but it, in our view, stands the test of time as one of the best. One needs to bare in mind that back in 1998 Internet technology was still developing and the ability to collaboratively build and share data in a three dimensional world where one is represented as an avatar was like viewing the future.
In addition to being able to build from a large subset of objects the ActiveWorlds server could import objects in .rwx or Renderware format. This opened up the world of architecture with a direct input path from AutoCad and 3DStudio Max.
If you take a look at The ARCH of note is the fact that one of the things architects and users in general are waiting for is the ability to import objects into Second Life from third party programs.
To discuss all things virtual the Avatars 98 Conference was held in ActiveWorlds, run by the Contact Consortium it provides a snapshot of the time:
 We guess most of the users are now to be found somewhere in Second Life, of note though is how quick users can be to change to the next big system.
Internet hype arrives in waves of innovation, the current wave is Second Life, as for the next wave? Wasn't there a rumour of a Google Virtual Environment last week?
2007-08-07
Iconic London Image - Geographic London Underground and 3D Buildings Update

Another update on progress with regards our 3D London Underground map.
The main map is complete providing a top down view of the actual geographic location of the London Underground Network. At the moment we are working on ways to give it a alpha channel and overlay on Google Maps, a Google Earth version is also in the pipeline.
If you give the map a slight tilt and add various 3D buildings of London then the map takes on a more iconic view of London:

The final part of the update was adding in all the underground stations names as 3D text allowing for a higher resolution render:

Embedded below is the iconic view of London rendered at 10000x5000 pixels and displayed via Google Maps using our Google Image Cutter Software:
Double click to zoom in or use the slider bar and drag to pan:
You can also view this full screen (recommended).
If people would be interested as using this as wallpaper then let us know and we'll render out various resolutions..
2007-07-13
Tutorial - Quick and Easy Augmented Reality from SketchUp/3DMax etc
Creating your own Augmented Reality is, thanks to ARTAG, staggeringly easy. Yet behind the simplicity lays a serious potential for both the hobbyist, local government use and the professional practice.
The only requirements are a webcam, printer and the ability to export models in either .obj, .wrl or .ase formats. As such if you have a model in SketchUp, 3DMax or any other common 3D package you can now view it on your desk using Augmented Reality.
Step 1
Download ARTag and unzip the contents to a folder. We generally use the desktop for easy access. Note the SDK kit is currently required as the demo on the main ARTag site has timed out. The contents are however mostly the same.
Step 2
Open your newly created folder - in our case under its default name of 'artag_rev2k_sdk_windows_1207' and navigate to the 'patterns' directory.
Step 3
 Open both base0.gif and toolbar0_7.gif as pictured to the right. Print our each of these .gifs making sure that your print options are set to 'scale to fit media' with either A4 or A3 paper (or your standard printers paper size).
Lay both these printouts side by side on your desk or workspace.
Step 4
Making sure your webcam is plugged in navigate to the 'compiled_demos' folder and double click on 3d_augmentations_usb.exe. This will launch a window in which the view from your webcam is displayed. If you move your cam towards the two marker sheets you printed out a series of 3D models will appear - as pictured below:
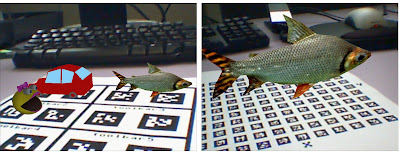
This is your first example of Augmented Reality, all we need now is to import our own objects.
Step 5
The objects that load on the marker grid are defined by a text file - setup_artag_3d.cfg. Open this file in a text editor such as Notepad.
 Pictured left we have highlighted the main line in setup_artag_3d.cfg. This defines the file to display on the main marker sheet, in the case of the first demonstration a fish.
To load your own objects you simply change this line to your files name and extension. For the movie below we made a simple windfarm in 3D Studio Max and exported both the textures (in .jpg format) and the file in .ASE format to the 'compiled_demos' folder. We then edited fish.obj to in our case windfarm.ase and saved the file.
Relaunching 3d_augmentations_usb.exe loads the changed file as illustrated in the Youtube movie below:
It is worth experimenting with a variety of objects with the system - a 3D Earth model works particularly well and has obvious applications for the teaching of geography in a classroom environment, especially if you print out the marker sheet in A1 size.
For more detailed info take a look at the ARTag site.
Let us know if you hit any problems or require any further tips..
*
Update 17th July 2007
As requested we have uploaded a sample .obj to load into the directory as a test for replacing the supplied 3d models in the demo. Download and unzip to the compiled demos directory the following file Globe.zip (542K).
The zip contains three files - Globe.obj, Globe.mtl and the texture in .jpg format - is this case a panoramic image.
Replace fish.obj with Globe.obj as per Step 5 and you should see a globe panorama on the main base0 maker sheet.
The only requirements are a webcam, printer and the ability to export models in either .obj, .wrl or .ase formats. As such if you have a model in SketchUp, 3DMax or any other common 3D package you can now view it on your desk using Augmented Reality.
Step 1
Download ARTag and unzip the contents to a folder. We generally use the desktop for easy access. Note the SDK kit is currently required as the demo on the main ARTag site has timed out. The contents are however mostly the same.
Step 2
Open your newly created folder - in our case under its default name of 'artag_rev2k_sdk_windows_1207' and navigate to the 'patterns' directory.
Step 3
 Open both base0.gif and toolbar0_7.gif as pictured to the right. Print our each of these .gifs making sure that your print options are set to 'scale to fit media' with either A4 or A3 paper (or your standard printers paper size).
Lay both these printouts side by side on your desk or workspace.
Step 4
Making sure your webcam is plugged in navigate to the 'compiled_demos' folder and double click on 3d_augmentations_usb.exe. This will launch a window in which the view from your webcam is displayed. If you move your cam towards the two marker sheets you printed out a series of 3D models will appear - as pictured below:

This is your first example of Augmented Reality, all we need now is to import our own objects.
Step 5
The objects that load on the marker grid are defined by a text file - setup_artag_3d.cfg. Open this file in a text editor such as Notepad.
 Pictured left we have highlighted the main line in setup_artag_3d.cfg. This defines the file to display on the main marker sheet, in the case of the first demonstration a fish.
To load your own objects you simply change this line to your files name and extension. For the movie below we made a simple windfarm in 3D Studio Max and exported both the textures (in .jpg format) and the file in .ASE format to the 'compiled_demos' folder. We then edited fish.obj to in our case windfarm.ase and saved the file.
Relaunching 3d_augmentations_usb.exe loads the changed file as illustrated in the Youtube movie below:
It is worth experimenting with a variety of objects with the system - a 3D Earth model works particularly well and has obvious applications for the teaching of geography in a classroom environment, especially if you print out the marker sheet in A1 size.
For more detailed info take a look at the ARTag site.
Let us know if you hit any problems or require any further tips..
*
Update 17th July 2007
As requested we have uploaded a sample .obj to load into the directory as a test for replacing the supplied 3d models in the demo. Download and unzip to the compiled demos directory the following file Globe.zip (542K).
The zip contains three files - Globe.obj, Globe.mtl and the texture in .jpg format - is this case a panoramic image.
Replace fish.obj with Globe.obj as per Step 5 and you should see a globe panorama on the main base0 maker sheet.
2006-09-05
How to Create an Aerial Panorama from Google Earth

Peter Murphy (one of the leading lights in the panoramic world) sent us a email on Monday with the thought of creating panoramas from a Digital Earth. The concept is simple - grab a series of screen shots while rotating above the earth and then stitch the images as if they were normal photographs.
A day is a long time in Internet based tutorials and this is now an update of the original as a result of Gaby, a digital urban reader, writing a kmz tool to dramatically simplify the process of capturing screen shots. The whole process should take approximately 40 minutes.
 The first step is to go to Gabys Kmz Panorama Capture Tool and type in the Lat/Long of the location you want to capture - in our case above the Millennium Dome in London.
To create panoramas it is important to rotate the camera around the nodal point of the lens in order to minimise any parallax error as the scene is captured. Previous to Gaby's tool the best way was to use the 'Flight Simulator Mode' by clicking 'Ctrl-G'. Combining this with a 'left mouse click and drag' action you can look around the scene and thus simulate a panoramic camera.
You can now simply load up the kmz file which is output from your Lat/Long co-ordinates and a series of placemarks are presented in the Google Earth, each representing camera locations. Select each placemark and wait for the streaming in Google Earth to reach 100%, now use File - 'Save Image' and call your image image1.jpg. Go through this for each placemark and you should end up with 28 images, each saved in sequence - ie image 1.jpg to image 29.jpg.
 Once you have your numbered screengrabs you now need to stitch them, we used Stitcher from RealViz, you can download a trial version from the RealViz website. If you are a PTGui user we have created a Template to automatically stitch your images. Download the Template and follow these steps:
1) Open PTGui and click Select Source Images - Navigate to where you saved your screengrabs and select all of them.
2) A Camera Lens Dialoge will appear, simply click 'Cancel'. Your images will then load into PTGui.
3) Click File 'Apply Template' and select the location of the GoogleEarthTemplate.pts saved from above.
Your images will now automatically align, you can now complete the process by selecting the 'Advanced' button in the top right hand side of PTGui and then 'Create Panorama'. Save your panorama as a Tif, we normally output at 6000x3000 pixels. Advanced users of PTGui can add their own Control Points and stitch as normal, lens parameters should be 30mm Rectilinear.
 To stitch the images you can also use the AutoStitch feature of RealViz to simply load in the images and automatically create a panorama. It should be noted that the curve of the earth will not stitch perfectly due to parallax error resulting from the Flight Simulator mode of Google Earth, the image left illustrates this (click for a larger version).
Fixing the parallax's error is simply a case of slightly cropping off the top of the resulting panorama to give us the image as below, this applies to both PTGui and Realviz Stitcher outputs:

As Google Earth doesn't include clouds we can now add them in as a new layer in photoshop. We used a panoramic image of clouds from TurboSquid, these used to be free but are now $5 each. If you don't have a cloud panorama then you can always create your own using Terragen, there is a great tutorial on how to do this here.
Adding the clouds gives you the final panorama over London (click for a larger view) :

Changing the projection of the resulting image allows a number of views such a hyperbolic image of London from Google Earth:

Finally to create a Quicktime Virtual Reality scene from the image - so you can look around the panorama - download Pano2QTVR.
The resulting QTVR can be viewed here (2.8Mb).
Of note in the final scene is how the Google copyright crops up in various places in the image. This is due to each screengrab containing the Google overlay and depending on the overlaps some are automatically blended out in RealViz and some remain... *update - using PTGui all copyright seems to be removed, this opens up the question on the legality of creating panoramas? *
Peter has used NASA's Worldwind to the same effect, see here for his panorama of the Southern Highlands (Quicktime format).
If you create any panoramas using Google Earth we would love to hear from you...
Panoramas submitted so far cover
London, New York, Moscow, Belgium, Paris and Sydney.
Subscribe to:
Posts (Atom)