


A week is a short time in digital urban technologies and where as Denver was by far the best city in Google Earth, it has been out paced by a new release covering Berlin.
We would of covered this sooner but our move to Windows Vista has left us with graphic card problems and thus an inability to capture movies at a high frame rate. As such the post is thanks to the Google Earth blog who have full coverage and the following movie:
Read the full details via Google Earth Blog. Thanks also to Andreas of the Chosaq Blog for sending this in.
Showing posts with label Google Earth 20-30. Show all posts
Showing posts with label Google Earth 20-30. Show all posts
2007-03-09


2007-03-08
Google Earth using the Wii Remote
Previous posts have looked at using the Xbox controller to navigate Virtual Earth and our use of ping pong balls and LED's to control Google Earth ala Minority Report - now you can control Google Earth using the Nintendo Wii Remote:
Interesting, the Space Navigator still seems to be the best solution however..
Interesting, the Space Navigator still seems to be the best solution however..
2007-02-27
Denver - Most Detailed 3D City in Google Earth
Picked up via the excellent Google Earth Blog is this flythrough of Denver with the newly released buildings - this now makes it the most texture mapped city in Google Earth:
Frank, over at the Google Earth Blog, has another post which is worth a look examining the pros's and con's of Microsoft's auto capture vs Google's custom made buildings for city visualisation.
Google's Denver is impressive but it sure doesn't scale (unless of course you have vast amount of money and a dedicated team), Microsoft, on the other hand, has invested a substantial sum in automatic capture and it seems to be paying off.
Interesting times ahead..
Frank, over at the Google Earth Blog, has another post which is worth a look examining the pros's and con's of Microsoft's auto capture vs Google's custom made buildings for city visualisation.
Google's Denver is impressive but it sure doesn't scale (unless of course you have vast amount of money and a dedicated team), Microsoft, on the other hand, has invested a substantial sum in automatic capture and it seems to be paying off.
Interesting times ahead..
2007-01-06
How to Create a Professional Zoom Movie in Google Earth (Free Version)
*Update - see our latest post, creating a zoom movie in Google Earth is now much easier... *
The best movies of earth involve a zoom from space to a ground based location. Obviously with Google Earth we can navigate around the globe but its not so easy to create a movie zooming down to a specific location.
You can always use placemarks but the path is not always the one desired and the framerate can be too fast to capture a movie. It would also be good to be able to use the free version of Google Earth rather than the 'Pro' which has the ability to export movies.
To this aim we found that the best way to control the movie capture is to start from the ground and zoom out - to then gain the impact of zooming from space all you have to do is reverse the movie. In this tutorial we show a step by step method to achieve results similar to the movie below, it should take 15 minutes from starting your capture to the finished result.
To create the movie you will need a few pieces of software, firstly Google Earth, secondly FRAPS (to capture the movie) and finally VirtualDub and Avisynth to reverse it.
Step 1: Local Cache
First of all we are going to do a test run to ensure all the images from Google Earth are in our local cache before we record the movie, this will ensure we don't have to wait for images to download while we are capturing.
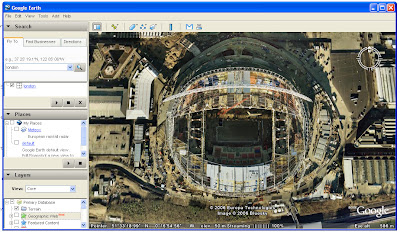 To zoom out smoothly from the earth a good technique is to use the 'double right click' method, this provides a regular zoom level and a smooth method to capture the movie, once we have loaded all the images into cache we are ready to record the movie.
Step 2: Record the Movie
FRAPS is excellent software which allows you to capture at high resolution and high frame rates from any package that uses OpenGL or Direct X. As such FRAPS can be used to capture any movie you wish in Google Earth in real-time, this is not only a considerable time saver compared to the 'Pro' version of Google Earth, it also means you can make movies in the free version.
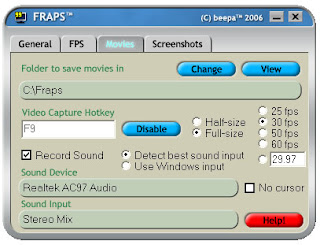
To record the movie we simply load up FRAPS, note which hotkey to use to capture movies (we use F9) and then maximise Google Earth. Hit the FRAPS hotkey and then start zooming out from your chosen location to space, we recommend a slow smooth zoom using the right double click method which we outlined above.
When you have reached a view of the earth to end the movie simply re-hit the FRAPS hotkey and your movie will be saved. It will of course be a movie zooming out of the earth which is not what we want but it has enabled us to capture smoothly, while controlling the location, something which is difficult when zooming into a view.
Step 3: Reversing the Movie
We can reverse the movie quickly and easily using VirtualDub and Avisynth, firstly install the applications and then launch VirtualDub. To enable the movie to reverse we need to take two simple steps, firstly to open the video and save as a uncompressed avi.
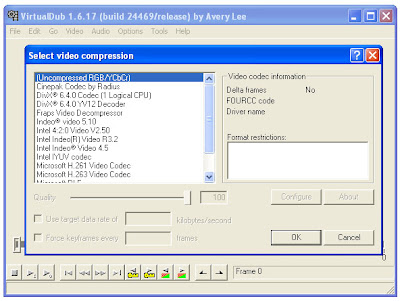 To do this, firstly open the movie and then select 'Video/Compression/Uncompressed' from the tool bar and click 'ok'. Now save your movie by selecting 'File/Save as avi'.
Your movie is now uncompressed and ready to be reversed. This is the final step and requires a small script to be saved and opened in VirtualDub. This again is easy, open up Notepad and cut and paste the following:
AviSource("yourmoviename.avi").Reverse()
Now save this notepad file as 'Reverse.avs' and open it in VirtualDub by going to 'File/Open Video File' and selecting Reverse.avs. Our movie is now shown zooming in from space to our location, click 'File/Save as avi' again and your movie is saved and ready to edit in a movie package such as Windows Movie Maker or to upload direct to YouTube.
If you use this tutorial we would love to know so leave a comment or get in touch via the sidebar.
Others in the 'How to' series include: How to Create an Aerial Panorama from Google Earth and Isometric Pixel Art - Simulating in SketchUp Tutorial.
The best movies of earth involve a zoom from space to a ground based location. Obviously with Google Earth we can navigate around the globe but its not so easy to create a movie zooming down to a specific location.
You can always use placemarks but the path is not always the one desired and the framerate can be too fast to capture a movie. It would also be good to be able to use the free version of Google Earth rather than the 'Pro' which has the ability to export movies.
To this aim we found that the best way to control the movie capture is to start from the ground and zoom out - to then gain the impact of zooming from space all you have to do is reverse the movie. In this tutorial we show a step by step method to achieve results similar to the movie below, it should take 15 minutes from starting your capture to the finished result.
To create the movie you will need a few pieces of software, firstly Google Earth, secondly FRAPS (to capture the movie) and finally VirtualDub and Avisynth to reverse it.
Step 1: Local Cache
First of all we are going to do a test run to ensure all the images from Google Earth are in our local cache before we record the movie, this will ensure we don't have to wait for images to download while we are capturing.
 To zoom out smoothly from the earth a good technique is to use the 'double right click' method, this provides a regular zoom level and a smooth method to capture the movie, once we have loaded all the images into cache we are ready to record the movie.
Step 2: Record the Movie
FRAPS is excellent software which allows you to capture at high resolution and high frame rates from any package that uses OpenGL or Direct X. As such FRAPS can be used to capture any movie you wish in Google Earth in real-time, this is not only a considerable time saver compared to the 'Pro' version of Google Earth, it also means you can make movies in the free version.

To record the movie we simply load up FRAPS, note which hotkey to use to capture movies (we use F9) and then maximise Google Earth. Hit the FRAPS hotkey and then start zooming out from your chosen location to space, we recommend a slow smooth zoom using the right double click method which we outlined above.
When you have reached a view of the earth to end the movie simply re-hit the FRAPS hotkey and your movie will be saved. It will of course be a movie zooming out of the earth which is not what we want but it has enabled us to capture smoothly, while controlling the location, something which is difficult when zooming into a view.
Step 3: Reversing the Movie
We can reverse the movie quickly and easily using VirtualDub and Avisynth, firstly install the applications and then launch VirtualDub. To enable the movie to reverse we need to take two simple steps, firstly to open the video and save as a uncompressed avi.
 To do this, firstly open the movie and then select 'Video/Compression/Uncompressed' from the tool bar and click 'ok'. Now save your movie by selecting 'File/Save as avi'.
Your movie is now uncompressed and ready to be reversed. This is the final step and requires a small script to be saved and opened in VirtualDub. This again is easy, open up Notepad and cut and paste the following:
AviSource("yourmoviename.avi").Reverse()
Now save this notepad file as 'Reverse.avs' and open it in VirtualDub by going to 'File/Open Video File' and selecting Reverse.avs. Our movie is now shown zooming in from space to our location, click 'File/Save as avi' again and your movie is saved and ready to edit in a movie package such as Windows Movie Maker or to upload direct to YouTube.
If you use this tutorial we would love to know so leave a comment or get in touch via the sidebar.
Others in the 'How to' series include: How to Create an Aerial Panorama from Google Earth and Isometric Pixel Art - Simulating in SketchUp Tutorial.
2006-01-12
University College London Google Earth

Following on from our model of the BT Tower we have placed online a model of the University College London Campus. The model is undergoing further development but coupled with the models already online and future sections it is starting to build up a picture of the Bloomsbury/Fitzrovia area.

Interestingly the model is now under 100K. If people would like to see any specific buildings modelled let us know...

You can download the kmz file to fly into the model in Google Earth here (94k)
2005-11-11
Google Earth London Eye Model

Originally modelled in 3DMax we have slightly revamped the London Eye for Google Earth. There are a few known issues but it illustrates how even complex landmarks can be imported.

You can download the kmz file to fly into the model in Google Earth here (1.4Mb)
Other models including St Pauls and a view of London in Google Earth can be viewed in previous posts.
As ever any comments are welcome..
2005-09-26
National Mapping Data with Google Earth

The main area of the Virtual London model was developed in both ESRI's ArcGlobe and Kinetix 3D Studio Max - largely by Steve Evans at CASA. We have now been able to export this data direct to Google Earth, allowing a rapid model of London to be visualised via the web with acceptable framerates.

There are issues with placement, most likely due to projection which needs to be addressed, but as a proof of concept it illustrates the ability to port highly detailed data to Google Earth.

Subscribe to:
Posts (Atom)